If you would like to view a certain part of the whitepaper click on the section link below:
What Is Digital Signage? A Beginner's Guide To Digital Displays
What Is Digital Signage?
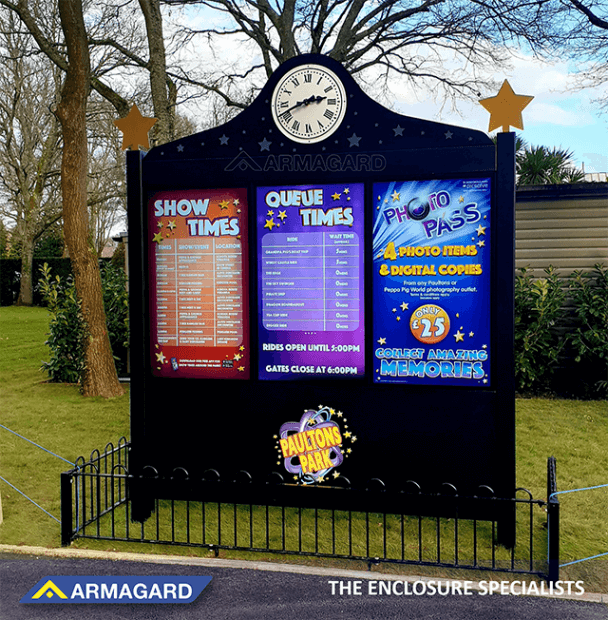
Digital signage uses audiovisual technology such as LCD and LED screens and media players to display interactive content. You can use digital signage to advertise, display information and more. Digital signage can display content such as images, video, social media feeds and real-time updates, simultaneously.
Why Digital Signage?
Digital signage is a cost-effective, manageable and eco-friendly way to advertise and display information compared to print media, static posters and billboards.
The growing number of digital signage networks, especially in urban locations, makes digital displays hard to avoid. Whether you are in a shopping mall, at a tourist hotspot, in a public space, at a transport hub, at a theater, outside a supermarket, in a parking lot or at a gas station, it is likely you will find digital signage.
Offering easy installation, convenience, speed, reduced costs and an opportunity to advertise on your own terms, under your control, and without the clutter of other advertisers means digital signage gives you far greater freedom, flexibility and value for money.
From a customer perspective, compared to other forms of advertising, digital signage is less intrusive. Instead, consumers identify digital signage as a better way to improve the shopping experience.
A recent FedEx study found that 76 percent of customers have entered a shop because a digital sign caught their attention. Meanwhile, according to an article published by MiniComDigitalSignage.com, digital signage 'doubles message retention and brand awareness'.
Digital signage benefits your customers, which benefits your business.
Where To Start With Digital Signage
There is a lot at stake when setting up a digital display network, so start with a basic plan. Digital signage is a long-term investment, which requires careful consideration of the following:
What Is The Goal Of Your Digital Signage Network?
Have a clear purpose for your digital signage network. This will influence how you setup your network. As a guide, here are some common goals specified by businesses investing in digital signage:
- Increasing sales and revenue… Brand awareness is high on the agenda when it comes to business objectives. Increased brand awareness equals increased recognition, generating more sales and revenue.
- Reducing costs… Opposite to making money is saving money. Companies turn to digital advertising to reduce printing costs, save money on paper use and save money on having to use advertising agencies, print media or web advertising.
- Improving the customer experience… Customer experience of the brand is important to business sustainability. Making your business accessible, recognizable and above all, customer-friendly, is another key objective of digital signage installation.
- Information or wayfinding… Transport hubs, hospitality venues, educational institutions and shopping malls are just some examples of facilities utilising digital signage as informative displays and 'wayfinding' solutions.
Have A Digital Content Strategy
Implementing a stylish digital signage solution is great, but what are you going to display on the screen? Critical to the success of your digital signage network is a content strategy.
Have a 12-month content plan in place, and display different types of digital content, otherwise your efforts could be sporadic and uninspiring.
Some key questions to consider when it comes to content include:
- Who is responsible for maintaining it?
- Who is accountable for what content appears?
- Who determines what the correct content is?
Content Creation
You can create content for your digital signage display in the following formats:
- Slides
- Pictures
- Graphics
- Animated graphics
- 3D graphics
- Video
- Live feeds
- Database content
The content you create should support the goals of your business.
Plan For The Future
Scalability of your digital signage network is vital to your plan. Bear in mind that customer expectations change quickly, and so does the technology they use. This will have a direct effect on your content.
Furthermore, your own objectives as a business may shift focus. Your initial plan for your digital signage content may be focused on driving sales. However, following deployment, it is very possible that you may want to change the goal (i.e. focus on educating or informing), based on traffic trends.
Where To Begin? Your Essential Checklist
1. What is the scale of your digital signage project?
- Number of locations?
- Number of displays at each location?
2. What is the timeframe for installing your solution?
- 3 months?
- 6 months?
- 12 months+?
3. Who is your target audience?
- Employees?
- Visitors?
- Customers?
4. What is the overall goal?
- Influence sales?
- Improve brand awareness?
- Notify and educate?
- Other?
5. Where do you plan to position your solution?
- Indoors?
- Outside?
- Semi-outdoors?
6. Who is responsible for installation?
- You?
- Your provider?
- Third party source?
7. What screen size do you intend to have?
8. Who will provide the screens?
9. What is your plan for creating content?
- In-house resources?
- Agency services?
- Other?
10. How will you display your content?
- Live feeds?
- 3D content?
- Images?
- Video?
- Other?
11. How will you manage content?
- Locally?
- Centrally?
- Other?
Next Steps
Once you have an initial plan, you can begin to think about the equipment required for your digital signage project. You will need to budget for the following:
- Software
- Hardware
- Protection
The Software
The software is intrinsic to the success of your digital signage, and bridges the gap between your content and your hardware.
Often referred to as content management systems, digital signage software allows you to schedule and coordinate content to appear on your screens. Software also allows you to control digital signage on a remote basis.
Your software will also allow you to distribute your message to displays across the country, or worldwide, if you plan to expand your digital signage network to such levels.
The Hardware
Digital signage hardware refers to the screens and the associated media players used to store content, and ultimately transfer it to your display.
The Protection
Protection of digital signage displays is often overlooked, a costly omission and it is not until equipment ends up damaged, vandalized or stolen that companies recognize the need for digital signage protection...
...That is where Armagard comes in.
Enclosures - The Cost Effective Protective Solution
Our contribution to the digital signage market is robust, stylish, tried and tested, digital signage enclosure solutions.
Our breed of enclosures are expertly engineered and feature the latest components, offering durable protection for digital displays for up to 10 years.
Enclosures are:
| Fully sealed | Impenetrable protection against dust, dirt, water and the weather. |
|---|---|
| Highly secure | Solid screen protection against vandalism and theft. |
| Self-sustaining | Temperature control systems can be added to stave off the effects of extreme temperatures, hot or cold. Can withstand temperatures as low as -22°F and as high as +131°F without damage to screens. |
| Sunlight resistant | Maintain screen clarity even when exposed to sunlight. |
| Completely customizable | Add a range of features to enhance the level of protection provided by your enclosure. |
| Manufactured to industry standards | All products are IP/NEMA rated. |
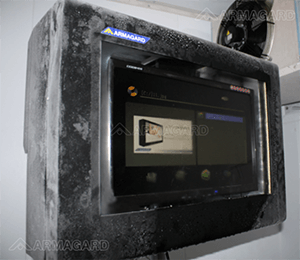
Armagard enclosures are performance tested in extreme temperatures. Here is Armagard's LCD screen enclosure at -22°F.
From our outdoor and indoor digital signage protection solutions, you can choose from a range of styles, sizes, colors and customization options to ensure that you get the best protective solution for your digital signage network.
Enclosures for digital signage start from 19", reaching 85" with landscape, portrait and 'totem' style units available.
Bestsellers
#1 - Outdoor Digital Signage Totems
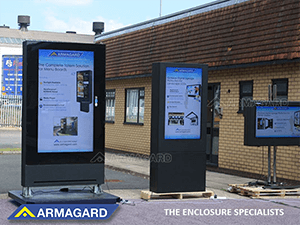
Some of the Armagard outdoor digital signage enclosure family.
Offering 19" - 85" screen protection, these unique outdoor units are a highly cost-effective generation of digital signage enclosures. They blend seamlessly into any environment, allowing you to position your display outdoors to function 7 days per week, 365 days per year.
They are weatherproof, dustproof, insect proof, vandal proof and theft proof. They offer the complete package when it comes to safeguarding screens used outdoors. They can be equipped with numerous features including:
- The unique Plenum Chambers cooling system.
- Thermostatically controlled temperature regulation units.
- Anti-glare or anti-reflective technology.
- Touch screen features.
- Polycarbonate viewing screen.
These extraordinary engineering innovations give you a platform to protect your digital signage network for up to a decade or more with minimal maintenance requirements.
#2 - Outdoor LCD Digital Signage Enclosures
Armagard's classic generation of LCD enclosures can accommodate screen sizes between 19" and 85", providing everything needed to sustain, and improve the performance of, any commercial grade LCD screen.
Highly unique because of its versatility, the LCD enclosure can be applied indoors or outside for industrial or commercial use. In particular, these enclosures are popular with educational institutions, public sector businesses and corporate organizations, used to house screens that display information.
The LCD enclosure is completely sealed using a combination of high strength silicone and optical bonding methods to achieve a NEMA 4 or NEMA 4X industry standard. It solves the problem of screen damage as it is totally:
- Weatherproof.
- Dust and dirt resistant.
- Insect proof.
- Vandal proof.
- Theft proof.
Essentially, nothing gets in!!!
All internal components of the enclosure, including the screen, are protected against potential external damage threats. Units can be jet washed without any harm to the LCD screen and the mild steel structure of the enclosure protects against forceful impacts.
For outdoor, or indoor digital signage enclosure solutions, Armagard are the go to business. So reliable are our products, customers have coined the phrase 'Get me an Armagard.'
Armagard enclosures have provided protection in the most hostile environments, from ships traveling to the Arctic Circle through to the humid surroundings of a swimming pool.
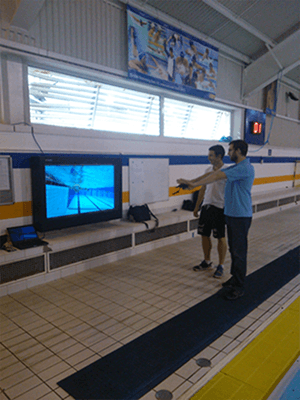
Armagard LCD enclosure,
poolside at British Swimming Training Venue.
Digital Signage Installation
The most important factor when digital signage installation day arrives is the positioning of your digital signage display.
You have got:
- A great list of digital signage objectives.
- An awesome content plan.
- Software, hardware and protection.
- A team ready to install your network.
So, don't fall into the trap of botching the positioning. You must also be aware of keeping your display free from obstructions, which could affect airflow or cause vent blockages.
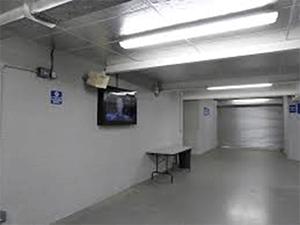
Spot the problem?
Digital Signage without an audience is doomed to fail.
Location, Location, Location
If you have a location in mind, it is important that you understand how your potential audience navigates that space. This will help you to position your display within the direct line of sight, maximizing the potential of your audience seeing the message on the screen.
The Science of Signage Positioning - Viewing Distances (source: digitalsignage.net)
- An average individual with 20/20 vision can accurately see and read text a few inches tall on a display 20 to 25 feet away
- People advancing towards a screen 20-25 feet away will take an estimated 5-7 seconds to reach it
- The average person's vertical field of vision is 75 degrees below eye level and 60 degrees above eye level
- A person's field of attention is generally only 20 to 25 degrees of the field view
The Science of Signage Positioning - Viewing Heights and Angles
- From 5 feet away, the field of attention is within 2 feet of eye level
- From 10 feet away , the field of attention is within 4 feet of eye level
- From 20 feet, the field of attention is within 8.5 feet of eye level
While it may seem like overkill specifying viewing distances, heights and angles, such knowledge could be the difference between having a digital signage display that is 'well-placed' and one that is 'perfectly-placed'.
Outdoor Installation
The Challenges
Outdoor digital signage installation is much more challenging than indoor installation. Why? Because much of the hardware designed for digital signage is not outdoor compatible.
Outdoor obstacles include:
- Harsh weather.
- Dust and dirt.
- Insects.
- Extreme temperatures.
- Direct sunlight exposure.
- Security.
Such factors will have a detrimental impact on the performance and picture quality of any display.
The immediate barrier to digital signage installation in extreme indoor and outdoor locations is the inability to use any standard flat panel screen outside of a climate-controlled environment.
The average TV cannot survive an onslaught of rain, sleet, snow, ice, humidity, dust, dirt, insects and any other factors associated with a hostile environment.
Standard TVs are also incapable of coping with extreme temperatures. Intense heat or extreme cold can affect how a screen works and either extreme can quite easily distort a TV's frame.
Constantly changing temperatures - such as a cold night followed by a blazing sun rise - will create condensation likely to affect vital components of any screen.
Furthermore, direct sunlight exposure also creates screen glare and reflections likely to hinder the clarity of any picture. To combat the problem of screen visibility in bright locations you will need a sunlight readable or high bright screen for your digital signage application. A sunlight readable screen features enhanced brightness levels - the unit of measurement for screen brightness levels is NITS.
NITS are a unit of measurement of luminance, or the intensity of visible light, where one NIT is equal to one candela per square meter (CD/M2).
The higher the number of NITS, the brighter the screen. Choosing the right screen with a sufficient level of brightness for your application is extremely important. Common brightness requirements are 800 to 1,500 NITS for indoor displays, and 1,500 to 2,500 NITS for indoor displays in direct sunlight.
For outdoors, up to 5,000 NITS is generally recommended and for those in direct sunlight, 5,000+ NITS is recommended.
Meanwhile, digital signage use in outdoor environments makes displays vulnerable to vandalism and theft.
However, Armagard outdoor digital signage enclosures provide the perfect solution to the challenges presented by the great outdoors. Fully sealed, fully secured and fully equipped to withstand outdoor environments, your digital signage display can go anywhere without the risk of destruction.
Mounting Options
Based on installing a digital display using an Armagard enclosure solution, there are various mounting options available. Indoor and outdoor enclosures can be secured:
- From a ceiling.
- On a stand.
- To the wall.
- To the floor.
Screens are mounted within an enclosure using a universal VESA mount.
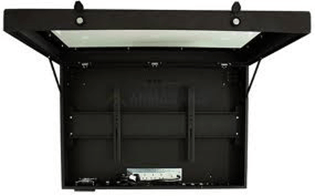
An example of a universal VESA mount within an Armagard enclosure.
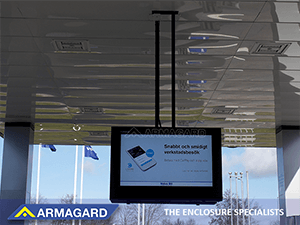
An example of ceiling-mounted, Armagard digital signage.
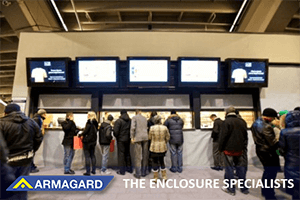
An example of wall-mounted, Armagard digital signage.
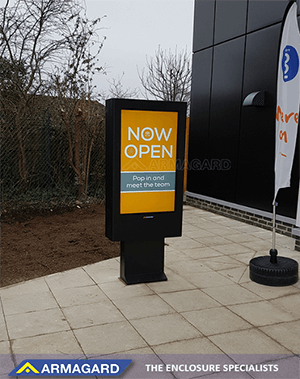
An example of floor-mounted, Armagard digital signage.
Correct Installation
Based on installing a digital signage network using Armagard enclosures, the following installation processes apply. In all cases, it is advised that you consult, and adhere to, the installation guidelines in your product manuals. This applies to the installation of both screens and screen protection.
Wall Mount Installation - Based On An Armagard LCD Enclosure And Screen
For installation of an LCD enclosure and screen the following tools are required:
- Phillips Screwdriver.
- Drill.
- Socket Kit or Wrench.
You also need to have the correct nuts, bolts, gland plates, brackets and other installation apparatus, capable of doing the job. You will then need to consult your company's health and safety guidelines to ensure safe lifting procedures.
Initial setup - In preparation for installation, your screen and power to the enclosure should be turned off (power should not be turned on until installation is complete). If weather conditions are poor, DO NOT ATTEMPT INSTALLATION. Furthermore, don't attempt to install an enclosure with a screen inside as the risk of damage or injury is increased. Also, do not attempt to install alone.
Cabling - Prior to mounting an enclosure, the cabling for your media player and screen should be positioned. Leads should be fed through the gland plate at the rear of the enclosure. Once pushed through, the gland plate should be sealed using the open or closed grommets (supplied) to secure the holes.
Cables should be fed through the gland plate from below. Feeding cables from above will result in water dripping down the cable and penetrating the gland plate.
Screen Bracket - Used to secure your screen to an enclosure, it should be positioned with the central hole of the bracket at the 'halfway line' of the display. This is to ensure a perfectly balanced unit.
To ensure a correct fit, your screen display should be placed face down on a flat surface (be sure to have something in place to safeguard your screen from scratches). Use a measuring tape to pinpoint the halfway line and then secure the screen to the bracket using the relevant screws.
Screen Check - The next step is to ensure that the screen will fit inside the enclosure, but, don't fix your screen to the unit until it has been wall-mounted. Lower your screen into the enclosure and mount on the interior mounting plate. If a unit is fitted with an air curtain, ensure that there is a 15mm gap between the screen and the viewing window, any less and airflow could be restricted.
To rectify positioning, the screen should be raised or lowered by adjusting the mounting bracket, or by using additional bolts and washers.
Wall mounting - Similar to screen installation, the central hole of the LCD enclosure bracket should be at the halfway line of the unit for perfect balance. The mounting brackets of the enclosure should then be fitted to the rear of the enclosure using appropriate bolts (note: only recommended brackets should be used).
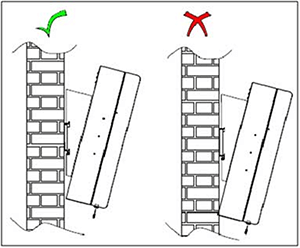
Correct and incorrect wall-mounted LCD enclosure examples.
Do not alter the enclosure in any way, for example, drilling additional holes. Such actions will only serve to reduce the ingress rating and void any warranty.
The wall plate should be secured using bolts long and strong enough to support the weight of both the screen and the enclosure combined. Once the wall plate is in place, the enclosure is ready to be mounted. The enclosure should then be mounted where there is adequate airflow.
Ensure the unit is positioned gently with the brackets slotting over the wall plate's top lip and avoiding contact with the wall. Finally, secure the locking bar and fit with a padlock to prevent theft of the enclosure.
Screen Mounting - Now the enclosure is in place, check to make sure that it is fixed securely. There should be no give and minimal movement. Once satisfied that the enclosure is secure, insert your display and media player, connecting the cables fed through earlier. Close the enclosure unit and power up. Now, you are all set!
Floorstanding Installation - Based On An Armagard 47" Totem Unit And Screen
For installation of a totem enclosure and screen, the following tools are required:
- Phillips Screwdriver.
- Drill.
- Socket Kit or Wrench.
Armagard totem enclosures are floorstanding units, capable of accommodating screens 46"-75" in size. They need to be fitted to a base in order to ensure secure installation.
Base mounting - NOTE - Do not open door of totem enclosure prior to installation.
- Prepare the mounting area with 4 embedded bolts that will lock the enclosure in place. It is recommended to use M8 bolts with appropriate washers and nuts.
- Prepare the ground area so that any electrical cables can be fed through safely.
- With 2-3 people to support the enclosure use an M6 Torx drill bit to remove the front and rear panels of the enclosure's stand.
- Feed all electrical wires through the circular void and then manoeuvre the unit onto the embedded screws. Secure using appropriate bolt heads.
- Once secured, test enclosure stability with gentle movement.
- Open one enclosure door and remove the 'closed' rubber gland seals and pull through any external cables. Then use either an open or closed grommet to fill in the gland plate holes, using a cable tie to secure any open grommets until they are water tight. Screw the gland plate back if removed.
- At this point, plug all interior cabling in to the surge protector ready for your display.
- Close and lock the enclosure.
Follow screen check and screen mounting instructions featured in the 'wall mount installation' section.
Stand Mount Installation - Based On An Armagard LCD Enclosure And Screen
Provided a universal VESA mount is fitted to your stand, simply mount your LCD on the VESA mount and secure in place.
Ceiling Mount Installation - Based On An Armagard LCD Unit And Screen
Start by assembling an Armagard ceiling plate:
1. Assembly of ceiling plate
- Items required
- Ceiling plate (image A).
- 2 small 'U' brackets.
- Bolts, nuts and washers.
- Place the two 'U' brackets through the ceiling plate as shown in image B.
- Tighten the 4 nuts and washers down so the two 'U' brackets are securely clamped to the ceiling bracket (see image C).
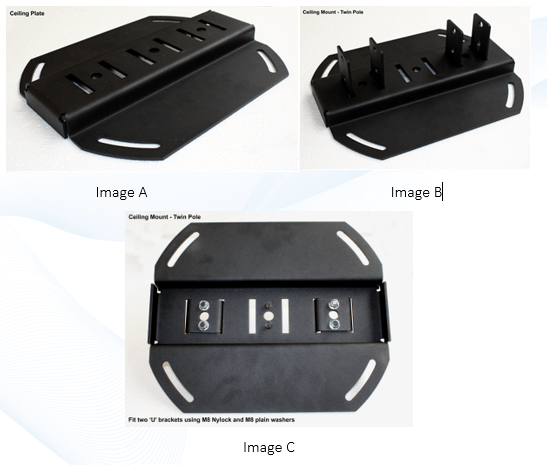
2. Once the ceiling plate and the two 'U' brackets are assembled, the ceiling plate assembly can be positioned at the correct location and securely bolted to the ceiling. It is important to make sure that: 1) The ceiling bracket is secured to the ceiling strongly enough to support the weight of two screens, two enclosures and the associated brackets. 2) The ceiling bracket is positioned so that the screens in the enclosures will face the correct direction when hung from the two poles.
3. For single screen locations, assemble the single mount bracket with two 'U' shaped brackets (see image D and image E). Ensure that all 4 nuts and washers are tightened so that the two 'U' brackets are securely clamped to the single mount bracket.
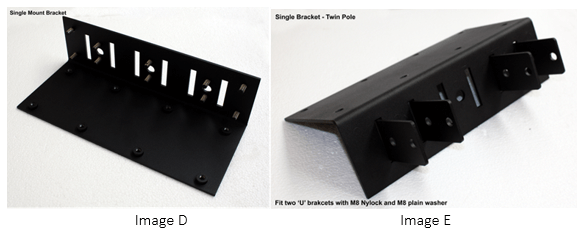
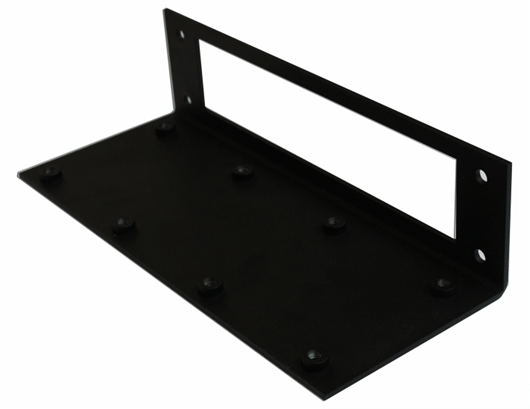
4. For a double screen location (enclosure/screens back-to-back), take the dual mount bracket (image F), and using 4 washers and nuts, clamp the dual mount bracket to the single mount bracket. See images G and H for completed sub-assembly.
5. Now, bolt on the wall plate assembly to single and dual mount brackets (see image I).
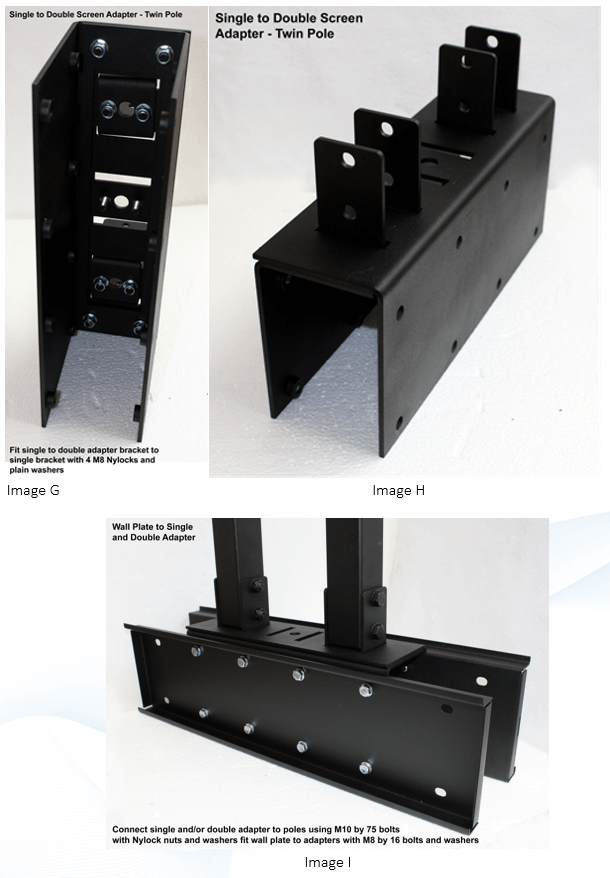
6. You now have the ceiling bracket sub-assembly mounted to the ceiling and the single mount or the dual mount with wall plate assembled.
7. The next step is to select the length of pole required so the enclosure and screen are mounted at the correct height. The pole lengths come in 2m, 1.5m, 1m and 0.5m lengths.
- Poles can be made longer using a pole coupler bracket to join two poles together (see images J, K and L).
- Poles can be reduced in length by cutting a section out of the poles, but then it is ESSENTIAL THAT ALL THE MOUNT HOLES ARE RE-DRILLED THE SAME SIZE AND LOCATION AND DEBURRED TO ENSURE INTEGRITY OF THE POLE MOUNT.
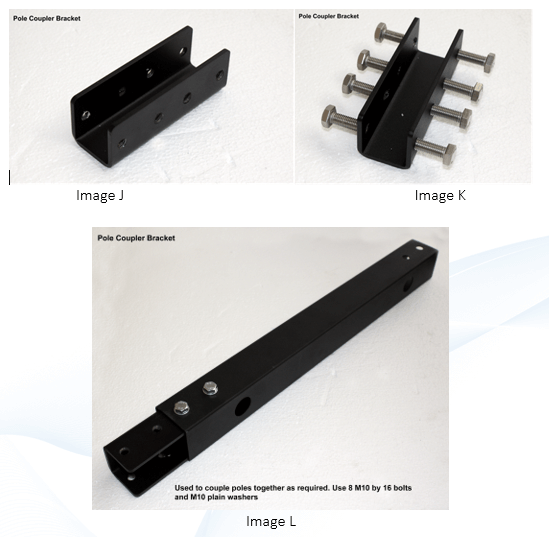
8. When connecting the poles to the ceiling bracket, and the poles to the single/dual mount, ensure that each pole end has all nuts, safety bolts and washers correctly positioned and tightened to ensure the safety of the hanging bracket.
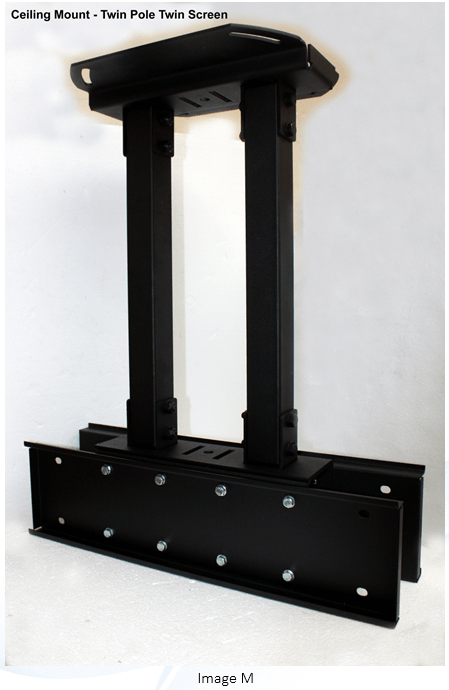
9. See image M for a view of the ceiling bracket, poles and dual mount ready for final assembly.
10. When running the cables to the screen, they pass down the inside of the poles to hide the cables.
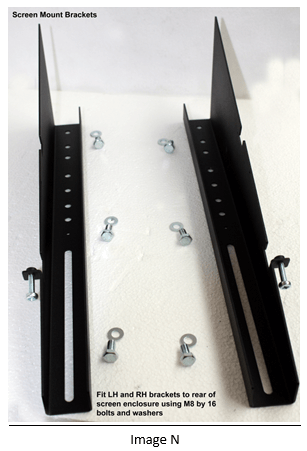
11. The 10 degree bracket (image N) should be mounted as high on the enclosure as possible. NOTE - these are left and right handed and should be mounted as such on every enclosure.
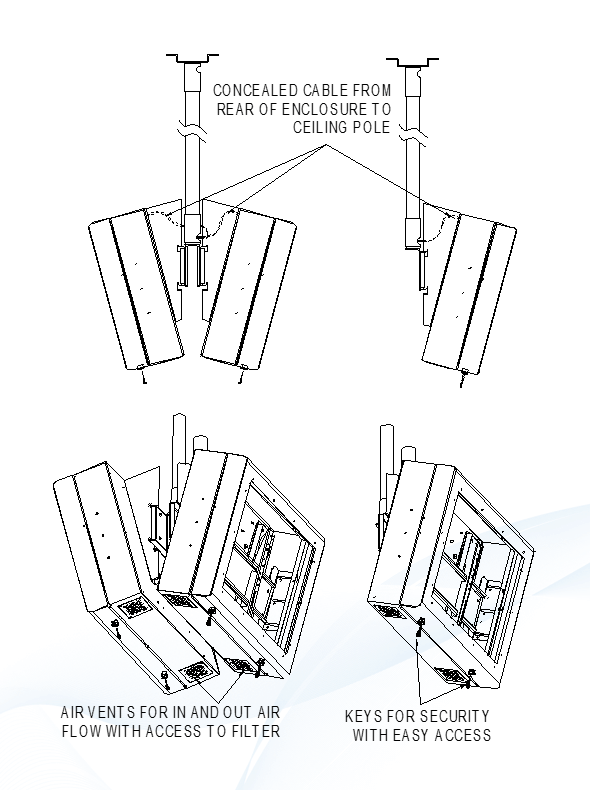
12. Once the 10 degree brackets have been secured to the back of the enclosure, mount the enclosure on the lower wall plate and tighten the screws using a Phillips screwdriver until they clamp onto the bracket. This is to ensure security and prevent any lift off of the enclosure.
13. Run cabling into enclosure via the cable glands.
14. Once enclosure is secure, open the door taking care to ensure it is held in open position using both the door stays.
15. Mount the LCD screen within the enclosure (after correct wiring has been routed).
16. Close the door and turn keys clockwise until locked.
Digital Signage Maintenance
Based on digital signage installation utilising an Armagard enclosure, maintenance will be minimal. However, here are some top tips for maintaining screens and enclosures alike.
Do:
Clean the viewing screen - Cleaning methods required will be determined by the type of viewing screen you have. Where glass screens are used, hot, soapy water will be sufficient enough to remove any excess dirt or debris. After cleaning, the screen should be rinsed thoroughly and wiped down with a clean cloth. Alternatively, you can use any off-the-shelf glass cleaner.
For polycarbonate viewing screens, water should be tepid and a soft sponge can be used accompanied with a mild cleaning detergent. Polycarbonate screens can be cleaned with steam or pressure washers, but avoid using detergents that are not polycarbonate compatible.
- Clean enclosure air filters - It is recommended that Armagard enclosure air filters are cleaned every six months to remove dust, dirt and debris. Any insect screens should also be cleaned and fan filters should be checked, and where necessary, filter pads should be replaced.
- Check enclosure integrity - It is advised that a maintenance check is carried out regularly on the integrity of the enclosure. The key areas to check are brackets, bolts, locking bars and screws, particularly in the event of unusually adverse weather conditions or attempted theft.
Don't:
- Use abrasive cleaning apparatus - Avoid using things like scourers, squeegees or brillo pads to clean enclosures, viewing screens or the LCD/LED screen. Such items are likely to leave scratches on both glass and polycarbonate screens.
- Obstruct ventilation systems - Keep your enclosure's vents free from obstructions. This will help to prevent overheating.
Minimal Maintenance
Provided your enclosure has been correctly installed it will require minimal maintenance and can sustain itself for up to 10 years or more.
Why Armagard?
We make it easy to buy digital signage hardware solutions in one place with the support of one point of contact. Call +1-866-434-0807 today for stress free digital signage project support.
